We get loads and loads of them around Indianapolis. Q233 runs out of Detroit to the UP at Salem with 86' boxcars and empty flats. We also get CSX's extra extra high 86' footers. The manifest off the UP at Salem (Q374) usually has 50% of its train consisting of boxcars, probably 50% of that string of boxcars is 86' footers.
My favorites are the SP ones with SSW reporting marks. They have "SP" right smack dab in the middle.
86' Hycube...it begins
-
CSXIndyLine
- Railroadfan...fan
- Posts: 436
- Joined: Wed Aug 04, 2010 9:12 pm
-
AARR
- Incognito and Irrelevant
- Posts: 39023
- Joined: Wed Dec 22, 2004 7:39 pm
- Location: Washington, MI
Re: 86' Hycube...it begins
Sorrry about hi-jacking your thread DTI 973, but your thread has attracted a few guys I've been meaning to ask some questions for a while.
It seems Ford is still using 86' box cars. Was there a time not so long ago they were getting away from them and going to intermodal/trucks?
I know GM still uses box cars for its truck assembly plants but do they still use them for its cars? Why would they use box cars for trucks and intermodal/trucks for cars?
Does Chrysler use box cars for anything anymore? Or do they only ship finished vehicles out by rail and everything inbound by truck?
PatC created a monster, 'cause nobody wants to see Don Simon no more they want AARR I'm chopped liver, well if you want AARR this is what I'll give ya, bad humor mixed with irrelevant info that'll make you roll your eyes quicker than a ~Z~ banhammer...
Re: 86' Hycube...it begins
Nice work DTI! I am wondering, could you post some pictures of you engines, with or without the hi-cube I am very intrested in your modeling!
"Ann Arbor 2373 Calling... Milkshake. Over"
All Aboard Amtrak: Northbound, Southbound, and My Hometown
All Aboard Amtrak: Northbound, Southbound, and My Hometown
Re: 86' Hycube...it begins
The Ford Deraborn Stamping plant uses 86 foot box cars. The Dearborn Frame plant uses 60 foot box cars. CN does all the switching.
-
conrailmike
- Signal Maintainer
- Posts: 2832
- Joined: Tue Jan 30, 2007 9:59 pm
- Location: Less than 100' from CSX (LSRC) Saginaw Sub. MP 61.4 in Highland, MI
Re: 86' Hycube...it begins
The Ford plant in Chicago Heights is a stamping plant so I would guess it's shipping out things like hoods and body parts.
Dearborn Stamping - same thing...shipping out stuff to be welded together (more than likely)
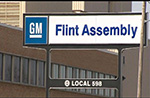
Don, the 86' boxes you see going into Flint are probably not going to Flint Truck, they are probably going into the back end of Flint Metal Fab to ship stuff out.
I don't recall any of the GM Assembly plants getting parts shipped in anymore. I would venture a guess that they want everything done as close to the way that Lansing Delta Township is set up. Everything is trucked in with docks all around the plant and parts are traveling no more than 100 yards from trailer to assembly line. Most of the parts now (if not all of them) are trucked to a big warehouse and held there or sequenced if they need to be and then trucked to the plant. For us at Lansing Delta Township, the Ryder warehouse is just down the street. We also get our interiors from Bridgewater which is also just down the road so you know all of that is trucked in.
Inventories are so close now that usually if there's a breakdown and we go home early, so does Bridgewater.
Dearborn Stamping - same thing...shipping out stuff to be welded together (more than likely)
Don, the 86' boxes you see going into Flint are probably not going to Flint Truck, they are probably going into the back end of Flint Metal Fab to ship stuff out.
I don't recall any of the GM Assembly plants getting parts shipped in anymore. I would venture a guess that they want everything done as close to the way that Lansing Delta Township is set up. Everything is trucked in with docks all around the plant and parts are traveling no more than 100 yards from trailer to assembly line. Most of the parts now (if not all of them) are trucked to a big warehouse and held there or sequenced if they need to be and then trucked to the plant. For us at Lansing Delta Township, the Ryder warehouse is just down the street. We also get our interiors from Bridgewater which is also just down the road so you know all of that is trucked in.
Inventories are so close now that usually if there's a breakdown and we go home early, so does Bridgewater.

Re: 86' Hycube...it begins
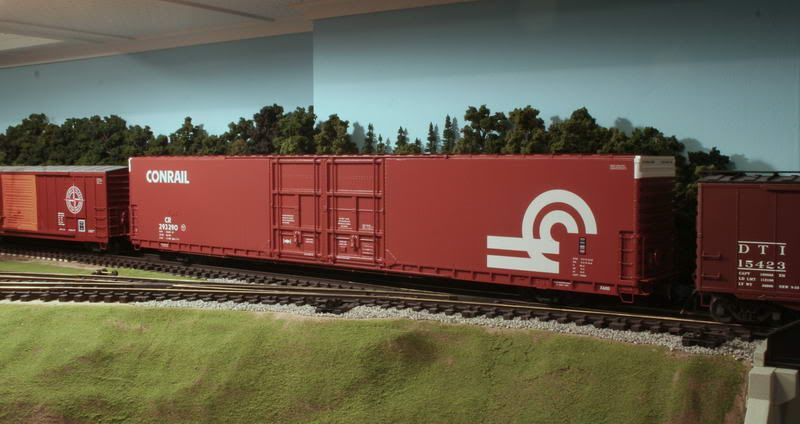
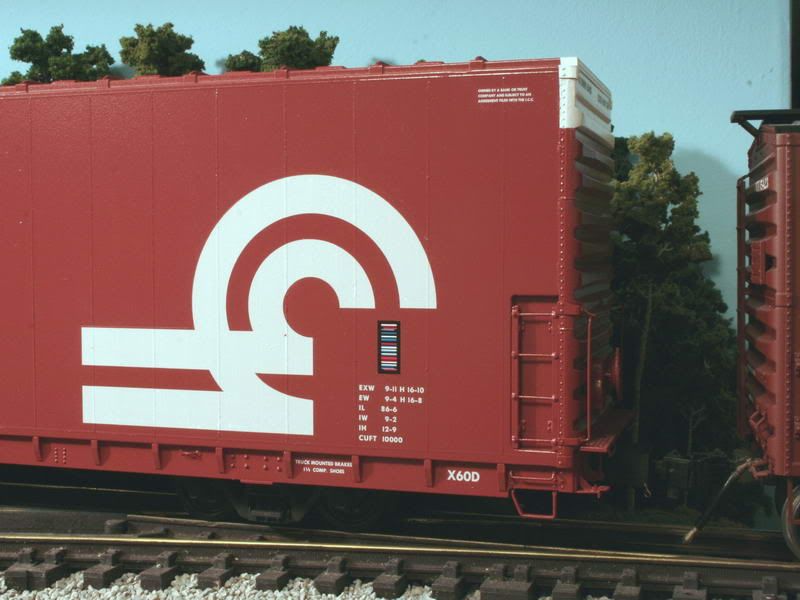
Well, I got the decals drawn up and printed, so yesterday I applied them.
It's at this point I can breathe easier and am getting very excited. I'm always
a bit worried when it comes to priming/painting/decaling as so many bad things can
(and have) happened during those phases. But this one is going really well.
Anyway, here's a few picts I just snapped. I still have a few more decals to print then add but I couldn't help myself showing it off.
Brian Briggs
DT&I 1980ish
DT&I 1980ish
-
AARR
- Incognito and Irrelevant
- Posts: 39023
- Joined: Wed Dec 22, 2004 7:39 pm
- Location: Washington, MI
Re: 86' Hycube...it begins
Beautiful! How do you make the rivets?
PatC created a monster, 'cause nobody wants to see Don Simon no more they want AARR I'm chopped liver, well if you want AARR this is what I'll give ya, bad humor mixed with irrelevant info that'll make you roll your eyes quicker than a ~Z~ banhammer...
Re: 86' Hycube...it begins
Don,
Here's a write-up I did for a largescale forum on some of my construction of this boxcar. I hope you find it interesting and informative.
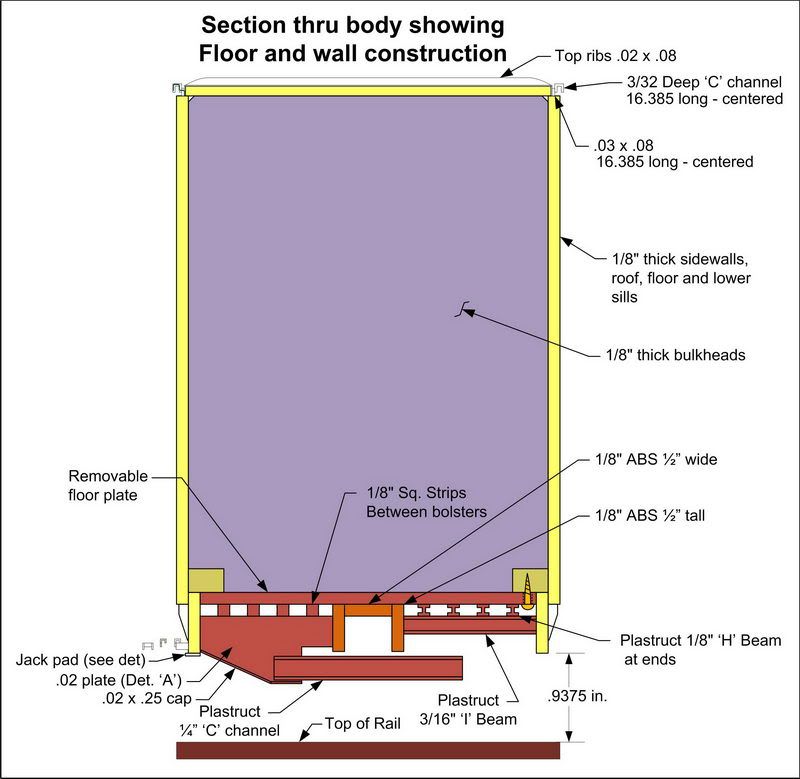
I find I really enjoy the research when there is some available. I sifted thru many books, magazines and websites as well as some of my own DT&I documents. From that I did what I always do, draw up a plan for the car I want to build. In this case I'm building a Pullman Standard early version 86' HyCube boxcar. It was nice to have a drawing to use as a starting point for my drawing (I found one in Mainline Modeler magazine....I'm still mourning the loss of that magazine). So, after drawing it up I then do a bit of engineering on the drawing establishing construction plans and convert it to standard commercial styrene sizes.
Here's an end view section showing how I laid out the construction. Most of the shell is made out of 1/8" ABS plastic (black). Solvent welded together
I knew I had the ends already done since I made the master pattern and mold when I built my P-S PS1 40' mini hycube boxcar. The ends were a kitbash of 2 USA Trains 40' boxcar ends stacked to match the hycube prototype. When I made that pattern I actually made it match the 86' car since doing the 40' mini meant just removing the upper most dart type rib (resin really sands and files very easily). The doors I knew I wanted to only make once since they would take a lot of work to make look good so I came up with my approach to how I build them into the model. I then made the pattern and cast them up.
Here's my plan for the doors, note I made the doors with a backing plate that gets glued to the inside of the boxcar sides.
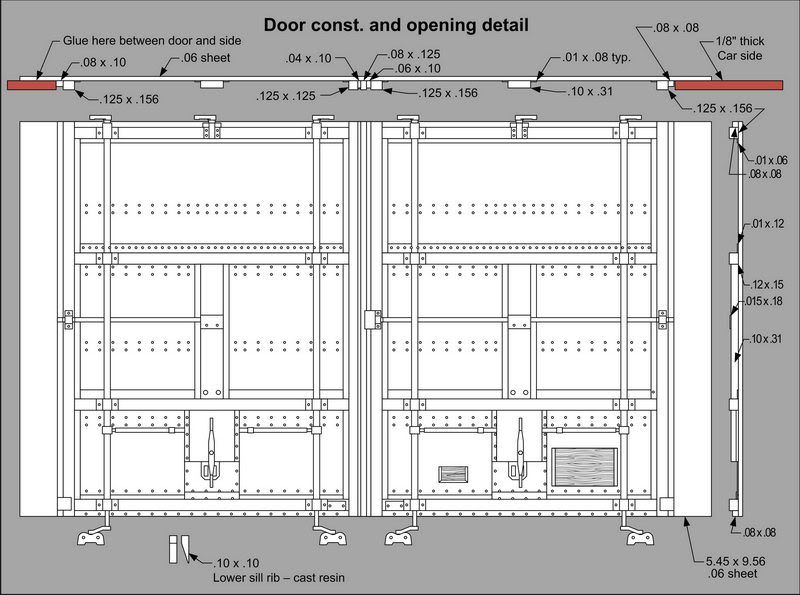
The real doors are recessed into the door opening just like the plan shows. That's something I learned while drawing and photographing the real cars for reference. That's another part of the research I enjoyed. I found out that one of the real DT&I cars was still running in captive service just south of Columbus, OH and I was lucky enough to correspond with a couple of people one of whom happens to substitute engineer on the train that hauls that car daily. He let me know the schedule and I was able to get a LOT of great close up shots for detail of the real genuine P-S car I am building.....how cool.
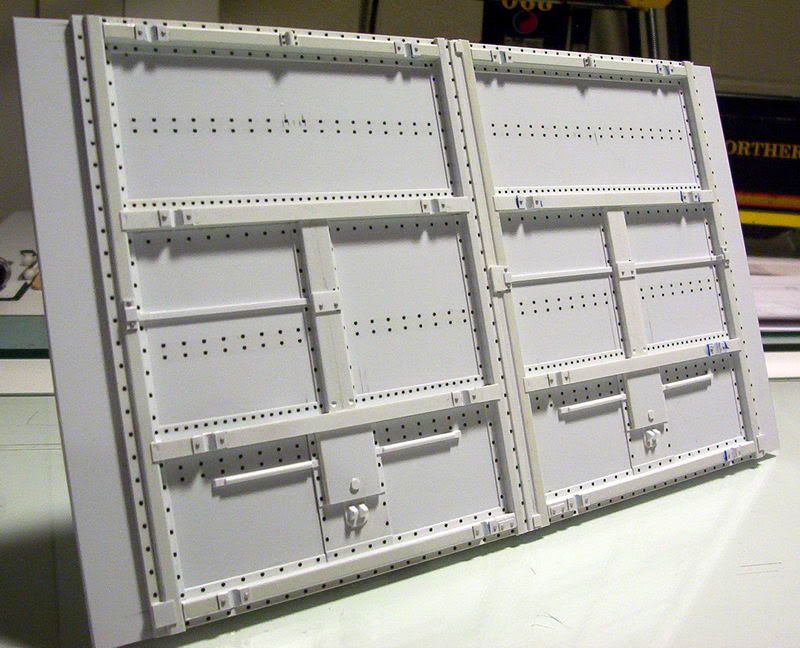
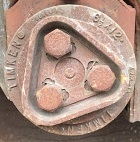
OK, side bar story aside, here's a picture of the pattern just before I cast it (I still had a couple rivets to put on after this picture). Most of the black rivets you see are actually Archer fine transfer resin rivet decals. They found a way to put resin blobs onto waterslide decal sheets. Archer has a website if your interested. (Micro-Mark is marketing thier own version) These rivets are 'O' scale bridge rivets.
Here's a shot of my first cast door part.
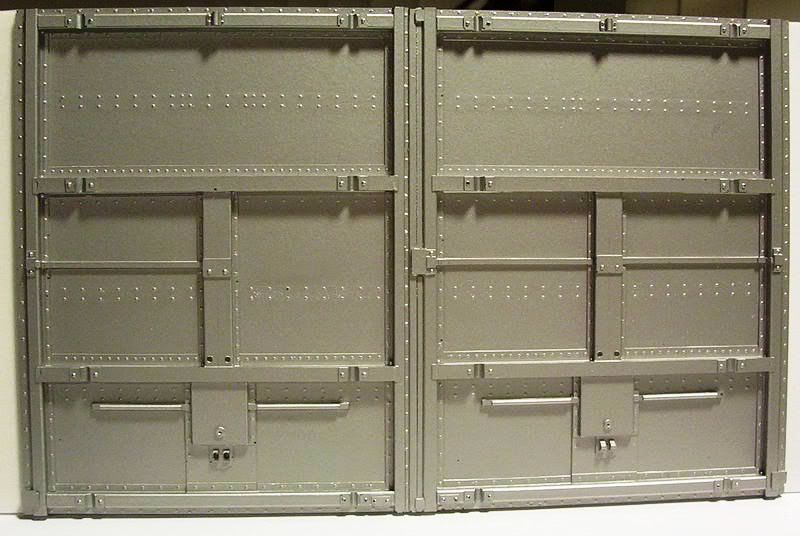
This is A.K.A. the cast that cleans out the mold and exposes where you need to concentrate your efforts when pouring them. A few of the resin rivets remained in the mold and are part of this casting. I also found out where air bubbles are likely to be a problem - as you can see in this part so now I use a little brush in the trouble spots when I cast each piece and that pretty much took care of that problem. Just for giggles I shot this part with Krylon aluminum spray to see how cool they'll look painted.
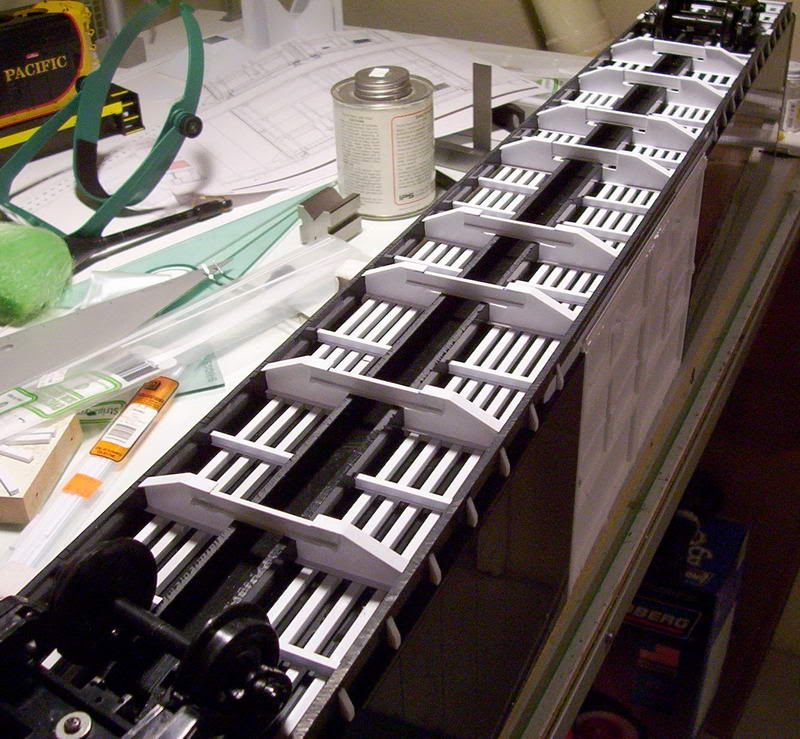
Here's a shot of the body flipped over showing the basic box construction.
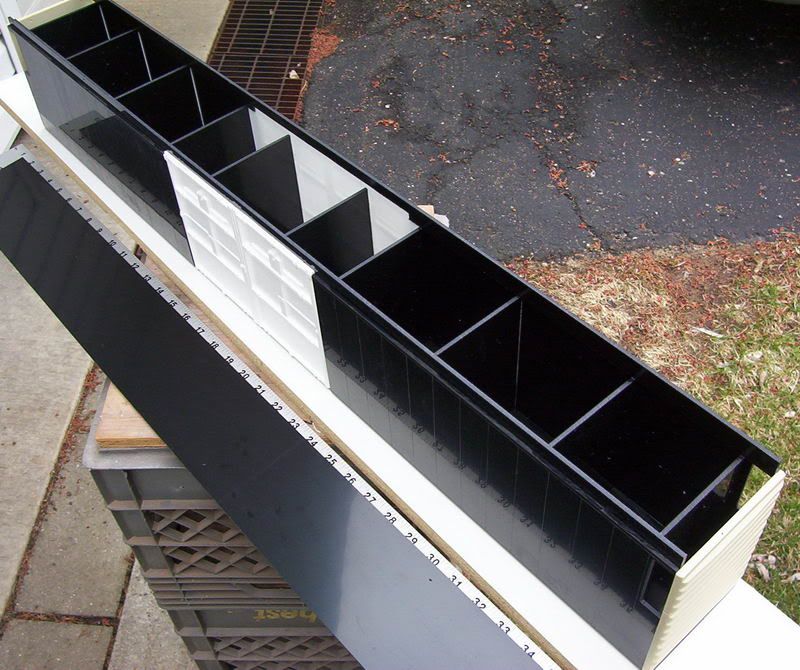
I cut the inner bulkheads to the height that the lower sill piece would register against them, that way no measuring to make sure they would parallel the side sheets. The lower sill pieces are one per side whereas the side sheets are 2 per side, as the doors interupt them in the middle. Cutting all the black ABS plastic sheets is done on a table saw as that is the most reliable way to make panels of the same size. I rip all the inner bulkheads at the same time which makes them identical in width which then makes it easy to keep the box square and parallel. Then use the table saw and fence to cut all the bulkheads to the same height so the floor will have an even surface to rest on. Refer to my end view plan to understand what I'm saying.
Here's a closer shot near the doors
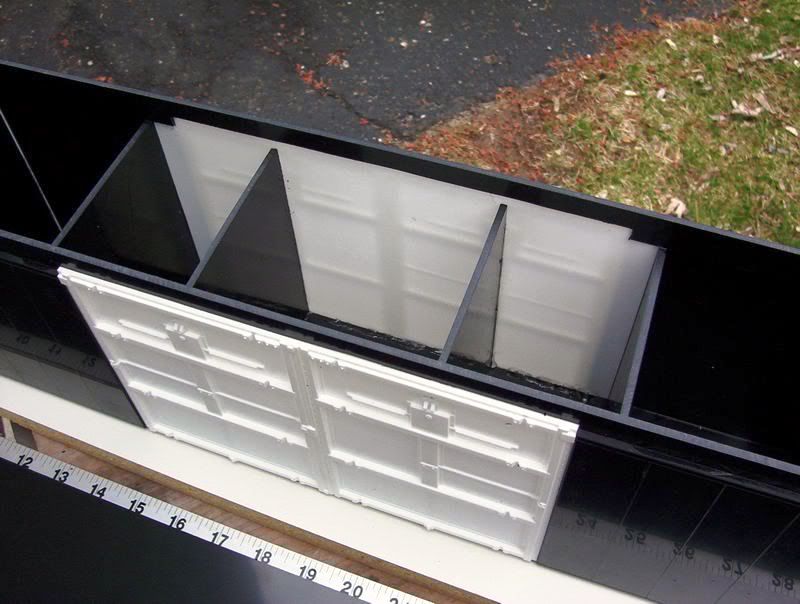
As well planned as I try, improvising along the way does happen. Notice I had to notch the lower sill pieces to clear the door casting. Notice also the bulkheads between the doors are narrower than the bulkheads between the sides. I built the box with the side bulkheads first, then I shaved (on the table saw) the bulkheads between the doors til they fit nice and snug. They are CA (superglue) glued to the resin door backsides.
Let me go backwards a second. Once I had the side pieces cut I scribed the weld lines on them, then to make one complete side I first glued the 2 side pieces to the doors using a straight edge to keep them all inline at the top surface. The bulkhead width then was determined by the end castings width. I played with a piece on the table saw till the sides were just a bit under the overall width of the end castings. At that point I stood the sides on thier top surfaces (another great use for a table saw is to use it as a surface plate to assemble on) and solvent welded some of the bulkheads to the sides. With them all on the table saw top it keeps the top of the sides and bulkheads flush so when I attach the top I know I have a solid and flat surface. Unfortunately I didn't take pictures of any of the above process.
Once the sides are glued together with the bulkheads I then CA glued the ends to the sides. Now it was time to cut and fit the roof. I left it a little long at each end knowing once the top was on I could file it down flush to the ends.
Here's what that stage looked like
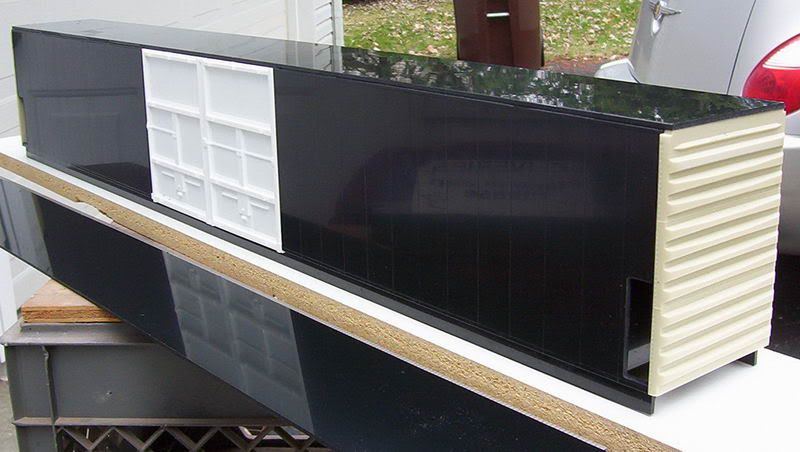
At the same time you rip the bulkheads to width it's good to rip the floor to the same width, and then when I went to fit it all together I shaved just a bit more off the side of the floor and it fits like a glove. The bulkheads are great because when you have the floor off they make nice handles to carry the body around when you work on it. I'll use them when I paint the body also.
Now that the basic box is complete it was time to start the detail work. First was to make the little ribs on the lower sill. Since I needed 48 of them plus 4 double wide ribs (made by doubling up 8 more) I decided I would take the time to make one nice one and cast it up. from that one I cast up 8 copies and made a pattern/mold of those 8. That way I only had to pour 7 sets to have the amount I needed. That may seem like a lot of casting but it beats trying to file 56 pieces to be the same size and shape. From there I just glued them onto the lower sill.
Here's a shot of it after that point
Also notice I've added white styrene behind the recessed ladder pockets in the sides at the ends, as well as the reinforcement plates below the doors. Also at this point I made body bolsters for the trucks to attach to on the floor. Nothing fancy there, just a build up of 1/8 " black ABS pieces 7/8" wide solvent welded to the floor plate.
Now I turned my attention to the roof. I determined the flange ribs wouldn't be worth the effort to cast so I made those out of styrene bits, a look at the drawings will show the sizes I used. But the reinforcing bump in the roofs I wasn't about to file 23 of those since they have several angles to them. Again I got lucky since that formation is the same as the mini hycube I had built. So I cast up 23 of those (casting those at the same time I was casting the little sill ribs).
Here's a look at the roof ribs in place
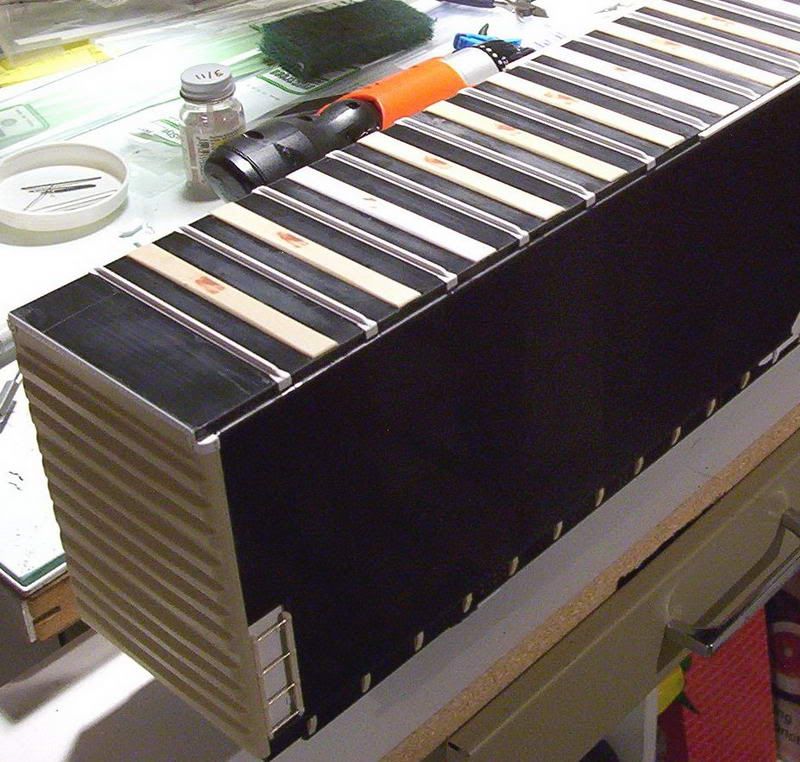
Notice I used a little spot putty to smooth out a rough spot in each formation (that shows the importance of taking the time to make the masters as perfect as possible)
So now that completes the roof.
Now, about the floor, I wasn't going to detail it much at first but since I had a good drawing of the floor arrangement, I decided it wasn't that much work to detail the floor.
Here's a shot of the floor after I had installed all the ribs and bracings
Once all those pieces were glued in place the floor plate went from flimsy to relatively rigid, especially the center sill.
I was still waiting to see the USA Trains 60 boxcar to see if I could use thier coupler box.
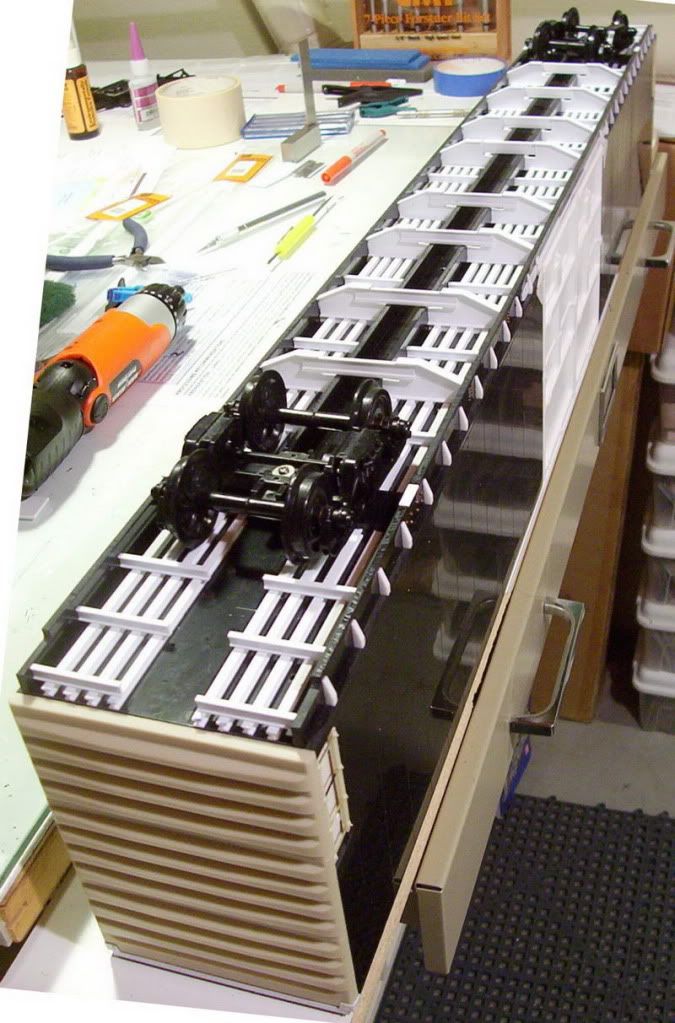
Not long after I got my first 60 footer from USA I decided I would use thier coupler box. I bought a set off of a fellow largescaler that had removed the body mount box and had installed truck mount couplers to his 60 footer.
Being anal retentive, I had to get rid of the USA couplers and replace them with the Accucraft #1 ga. couplers (AP11-738) which are actually 1/29 scale. I know because I measured them to a drawing of a scale coupler. I have been converting my fleet over to these couplers.
Here's a shot showing the coupler box and the modified Accucraft coupler installed.
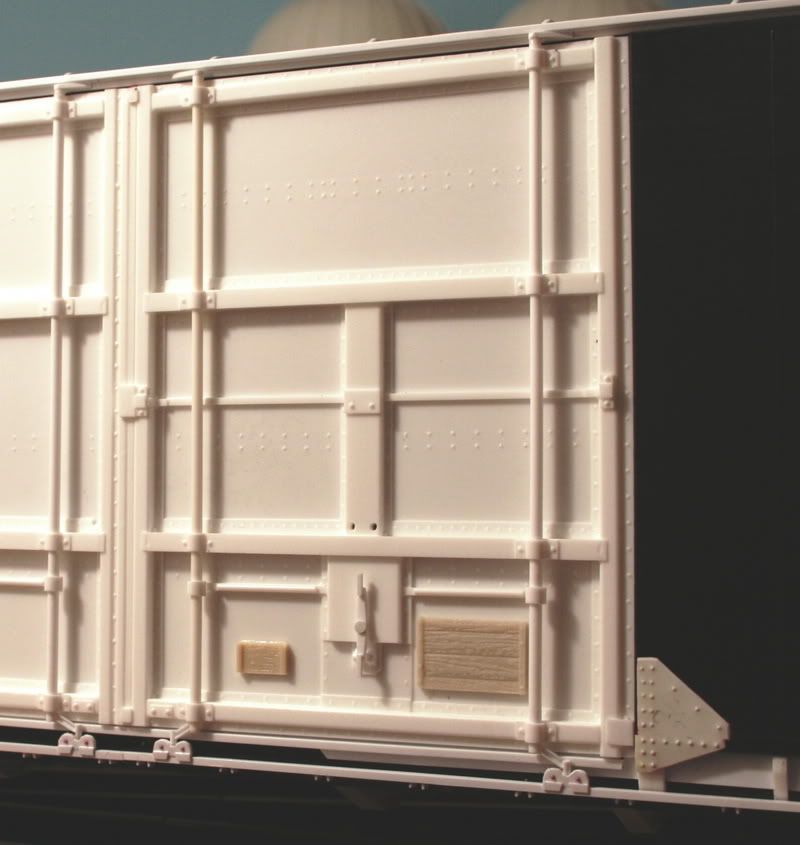
You can see in that shot that I was installing the side ladders (vertical pieces from Burl Rice - resin castings I had purcased from him when he was still doing casting) with brass rungs, drilled and glued in place.
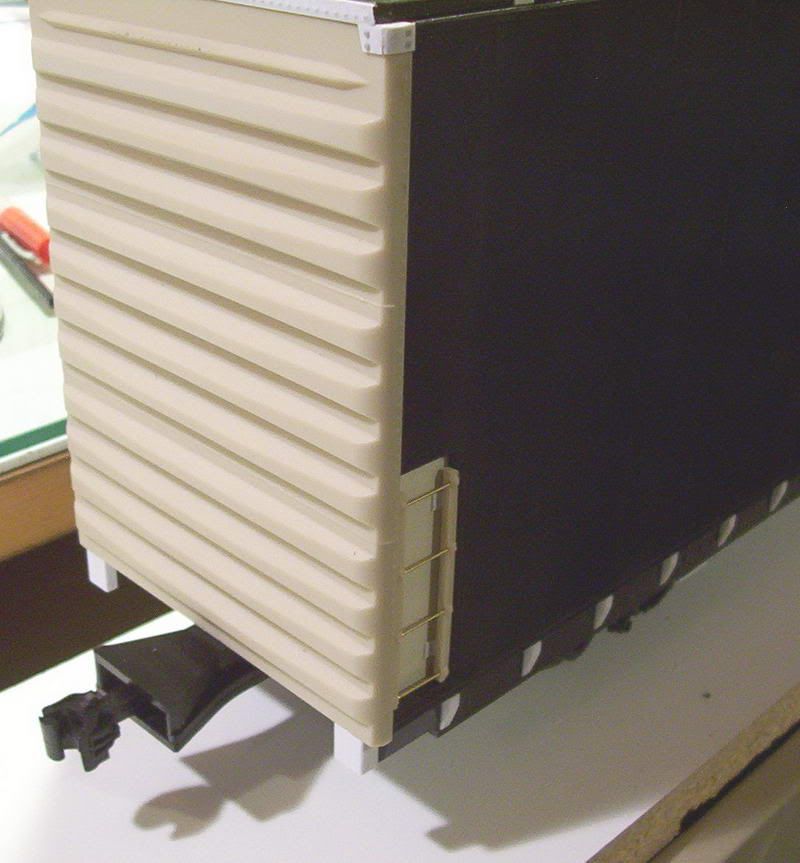
In this picture you can see I've used Tichy Train Group rivets (the brown ones) to represent the rivets for the bolsters and crossbearing beams as attached to the lower sill.
Also added are the car pulling loops on the lower sill.
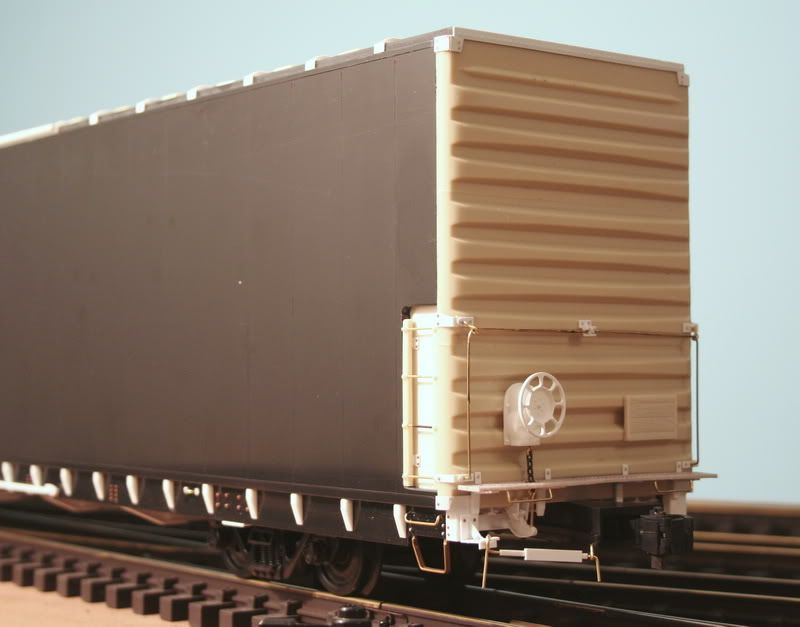
In this close-up of the end shows the many scratchbuilt bits and Grandtline rivets (the grey ones) that make up the end detail.
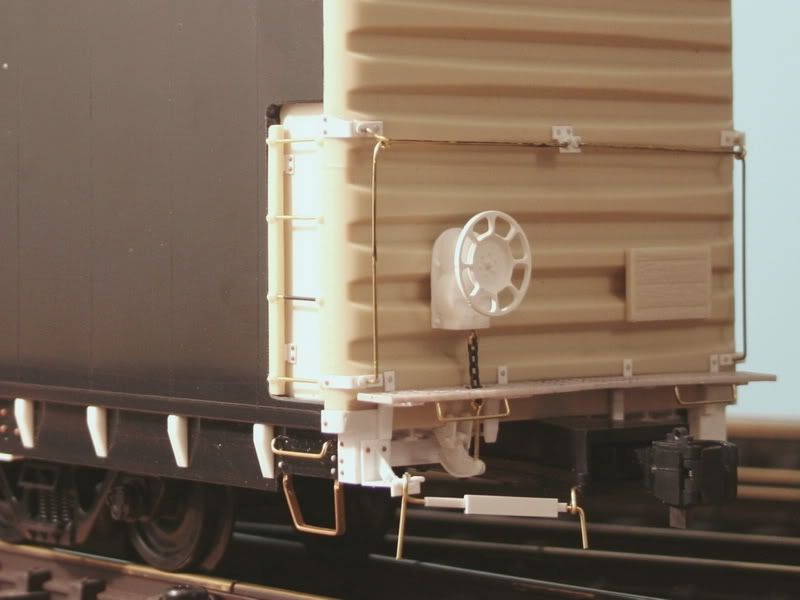
The brakewheel is a USA Trains part from the centerflow hopper car. The Ajax brake housing is a resin casting I made. The walkway is part of a USA trains boxcar roofwalk. The tackboard is a resin casting I did of a USA trains boxcar tackboard (I cast those when I was making my mini hycube boxcar).
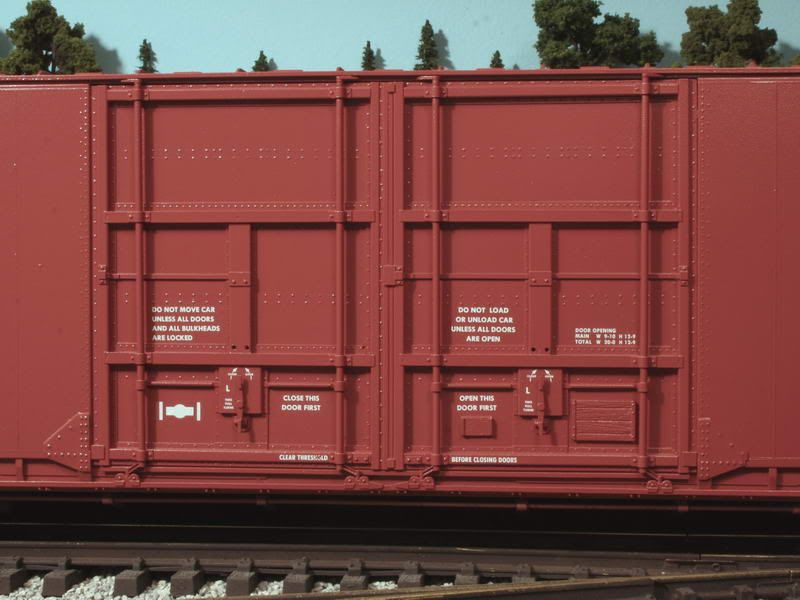
At that point I turned to detailing the doors
The vertical rods are 3/32 dia styrene tubes laid into the scallops and then capped with half cut 5/32 dia tubes cut at the cross ribs. All other little details are scratchbuilt bits of plastic.
Here's the underframe completed and painted.....I even did all the airline details (yeah, I know I'm crazy....)
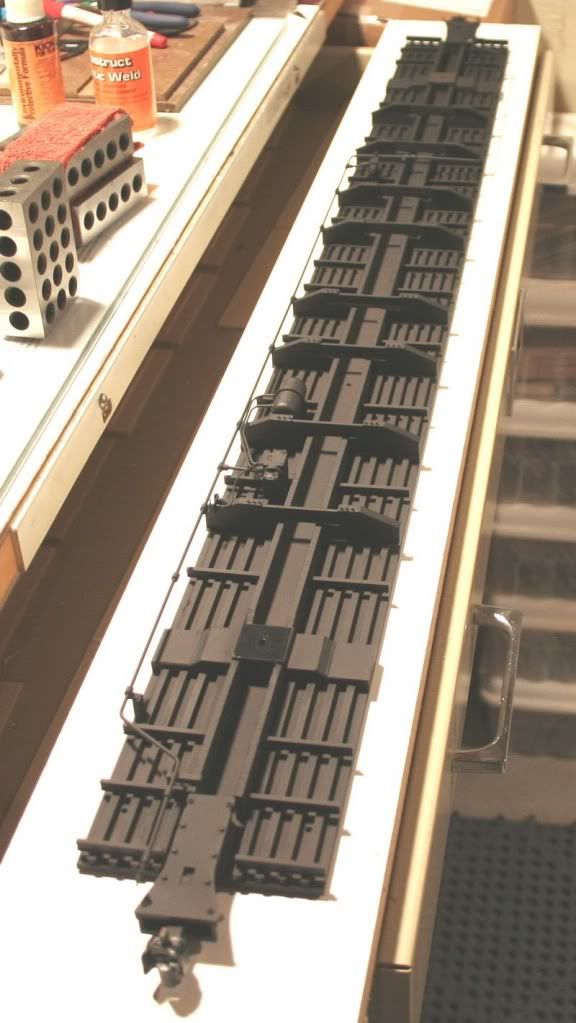
That should help explain some of my methods and madness.
Here's a write-up I did for a largescale forum on some of my construction of this boxcar. I hope you find it interesting and informative.
I find I really enjoy the research when there is some available. I sifted thru many books, magazines and websites as well as some of my own DT&I documents. From that I did what I always do, draw up a plan for the car I want to build. In this case I'm building a Pullman Standard early version 86' HyCube boxcar. It was nice to have a drawing to use as a starting point for my drawing (I found one in Mainline Modeler magazine....I'm still mourning the loss of that magazine). So, after drawing it up I then do a bit of engineering on the drawing establishing construction plans and convert it to standard commercial styrene sizes.
Here's an end view section showing how I laid out the construction. Most of the shell is made out of 1/8" ABS plastic (black). Solvent welded together
I knew I had the ends already done since I made the master pattern and mold when I built my P-S PS1 40' mini hycube boxcar. The ends were a kitbash of 2 USA Trains 40' boxcar ends stacked to match the hycube prototype. When I made that pattern I actually made it match the 86' car since doing the 40' mini meant just removing the upper most dart type rib (resin really sands and files very easily). The doors I knew I wanted to only make once since they would take a lot of work to make look good so I came up with my approach to how I build them into the model. I then made the pattern and cast them up.
Here's my plan for the doors, note I made the doors with a backing plate that gets glued to the inside of the boxcar sides.
The real doors are recessed into the door opening just like the plan shows. That's something I learned while drawing and photographing the real cars for reference. That's another part of the research I enjoyed. I found out that one of the real DT&I cars was still running in captive service just south of Columbus, OH and I was lucky enough to correspond with a couple of people one of whom happens to substitute engineer on the train that hauls that car daily. He let me know the schedule and I was able to get a LOT of great close up shots for detail of the real genuine P-S car I am building.....how cool.
OK, side bar story aside, here's a picture of the pattern just before I cast it (I still had a couple rivets to put on after this picture). Most of the black rivets you see are actually Archer fine transfer resin rivet decals. They found a way to put resin blobs onto waterslide decal sheets. Archer has a website if your interested. (Micro-Mark is marketing thier own version) These rivets are 'O' scale bridge rivets.
Here's a shot of my first cast door part.
This is A.K.A. the cast that cleans out the mold and exposes where you need to concentrate your efforts when pouring them. A few of the resin rivets remained in the mold and are part of this casting. I also found out where air bubbles are likely to be a problem - as you can see in this part so now I use a little brush in the trouble spots when I cast each piece and that pretty much took care of that problem. Just for giggles I shot this part with Krylon aluminum spray to see how cool they'll look painted.
Here's a shot of the body flipped over showing the basic box construction.
I cut the inner bulkheads to the height that the lower sill piece would register against them, that way no measuring to make sure they would parallel the side sheets. The lower sill pieces are one per side whereas the side sheets are 2 per side, as the doors interupt them in the middle. Cutting all the black ABS plastic sheets is done on a table saw as that is the most reliable way to make panels of the same size. I rip all the inner bulkheads at the same time which makes them identical in width which then makes it easy to keep the box square and parallel. Then use the table saw and fence to cut all the bulkheads to the same height so the floor will have an even surface to rest on. Refer to my end view plan to understand what I'm saying.
Here's a closer shot near the doors
As well planned as I try, improvising along the way does happen. Notice I had to notch the lower sill pieces to clear the door casting. Notice also the bulkheads between the doors are narrower than the bulkheads between the sides. I built the box with the side bulkheads first, then I shaved (on the table saw) the bulkheads between the doors til they fit nice and snug. They are CA (superglue) glued to the resin door backsides.
Let me go backwards a second. Once I had the side pieces cut I scribed the weld lines on them, then to make one complete side I first glued the 2 side pieces to the doors using a straight edge to keep them all inline at the top surface. The bulkhead width then was determined by the end castings width. I played with a piece on the table saw till the sides were just a bit under the overall width of the end castings. At that point I stood the sides on thier top surfaces (another great use for a table saw is to use it as a surface plate to assemble on) and solvent welded some of the bulkheads to the sides. With them all on the table saw top it keeps the top of the sides and bulkheads flush so when I attach the top I know I have a solid and flat surface. Unfortunately I didn't take pictures of any of the above process.
Once the sides are glued together with the bulkheads I then CA glued the ends to the sides. Now it was time to cut and fit the roof. I left it a little long at each end knowing once the top was on I could file it down flush to the ends.
Here's what that stage looked like
At the same time you rip the bulkheads to width it's good to rip the floor to the same width, and then when I went to fit it all together I shaved just a bit more off the side of the floor and it fits like a glove. The bulkheads are great because when you have the floor off they make nice handles to carry the body around when you work on it. I'll use them when I paint the body also.
Now that the basic box is complete it was time to start the detail work. First was to make the little ribs on the lower sill. Since I needed 48 of them plus 4 double wide ribs (made by doubling up 8 more) I decided I would take the time to make one nice one and cast it up. from that one I cast up 8 copies and made a pattern/mold of those 8. That way I only had to pour 7 sets to have the amount I needed. That may seem like a lot of casting but it beats trying to file 56 pieces to be the same size and shape. From there I just glued them onto the lower sill.
Here's a shot of it after that point
Also notice I've added white styrene behind the recessed ladder pockets in the sides at the ends, as well as the reinforcement plates below the doors. Also at this point I made body bolsters for the trucks to attach to on the floor. Nothing fancy there, just a build up of 1/8 " black ABS pieces 7/8" wide solvent welded to the floor plate.
Now I turned my attention to the roof. I determined the flange ribs wouldn't be worth the effort to cast so I made those out of styrene bits, a look at the drawings will show the sizes I used. But the reinforcing bump in the roofs I wasn't about to file 23 of those since they have several angles to them. Again I got lucky since that formation is the same as the mini hycube I had built. So I cast up 23 of those (casting those at the same time I was casting the little sill ribs).
Here's a look at the roof ribs in place
Notice I used a little spot putty to smooth out a rough spot in each formation (that shows the importance of taking the time to make the masters as perfect as possible)
So now that completes the roof.
Now, about the floor, I wasn't going to detail it much at first but since I had a good drawing of the floor arrangement, I decided it wasn't that much work to detail the floor.
Here's a shot of the floor after I had installed all the ribs and bracings
Once all those pieces were glued in place the floor plate went from flimsy to relatively rigid, especially the center sill.
I was still waiting to see the USA Trains 60 boxcar to see if I could use thier coupler box.
Not long after I got my first 60 footer from USA I decided I would use thier coupler box. I bought a set off of a fellow largescaler that had removed the body mount box and had installed truck mount couplers to his 60 footer.
Being anal retentive, I had to get rid of the USA couplers and replace them with the Accucraft #1 ga. couplers (AP11-738) which are actually 1/29 scale. I know because I measured them to a drawing of a scale coupler. I have been converting my fleet over to these couplers.
Here's a shot showing the coupler box and the modified Accucraft coupler installed.
You can see in that shot that I was installing the side ladders (vertical pieces from Burl Rice - resin castings I had purcased from him when he was still doing casting) with brass rungs, drilled and glued in place.
In this picture you can see I've used Tichy Train Group rivets (the brown ones) to represent the rivets for the bolsters and crossbearing beams as attached to the lower sill.
Also added are the car pulling loops on the lower sill.
In this close-up of the end shows the many scratchbuilt bits and Grandtline rivets (the grey ones) that make up the end detail.
The brakewheel is a USA Trains part from the centerflow hopper car. The Ajax brake housing is a resin casting I made. The walkway is part of a USA trains boxcar roofwalk. The tackboard is a resin casting I did of a USA trains boxcar tackboard (I cast those when I was making my mini hycube boxcar).
At that point I turned to detailing the doors
The vertical rods are 3/32 dia styrene tubes laid into the scallops and then capped with half cut 5/32 dia tubes cut at the cross ribs. All other little details are scratchbuilt bits of plastic.
Here's the underframe completed and painted.....I even did all the airline details (yeah, I know I'm crazy....)
That should help explain some of my methods and madness.
Brian Briggs
DT&I 1980ish
DT&I 1980ish
-
TrainWatcher
- The Beast
- Posts: 5934
- Joined: Fri Dec 08, 2006 1:28 pm
Re: 86' Hycube...it begins
There is only 1 word to describe that 86'.... EPIC. Great job!
-
AARR
- Incognito and Irrelevant
- Posts: 39023
- Joined: Wed Dec 22, 2004 7:39 pm
- Location: Washington, MI
Re: 86' Hycube...it begins
DittoTrainWatcher wrote:
There is only 1 word to describe that 86'.... EPIC. Great job!
PatC created a monster, 'cause nobody wants to see Don Simon no more they want AARR I'm chopped liver, well if you want AARR this is what I'll give ya, bad humor mixed with irrelevant info that'll make you roll your eyes quicker than a ~Z~ banhammer...
-
Saturnalia
- Authority on Cat
- Posts: 15463
- Joined: Wed Sep 28, 2011 7:54 pm
- Location: Michigan City, IN
- Contact:
Re: 86' Hycube...it begins
Wow. Thanks for posting. If you don't mind, how much does that sort of thing cost? Great craftsmanship. Make any of those in N scale?
Can't believe the detail
Can't believe the detail
Re: 86' Hycube...it begins
Thanks guys,
MQT, it's hard to say. I really don't keep track of that.
Let me give it a bit of a summary:
Hours and hours of research and developement including drawings, the actual components are a nominal amount of ABS plastic, many pieces of Evergreen and Plastruct styrene shapes and strips and the solvents and glues to attach them, Grandtline and Tichy rivets by the dozens, then the patternmaking (handbrake housing, tackboards, car ends, and doors that include a couple sheets of Archer rivet decals), moldmaking those components, then casting those parts in resin. Buying Accucraft couplers, stealing a set of rollerbearing trucks off a donor Aristocraft car, taking the AB brake reservior and regulator off a donor USA Trains car, and bartering for a pair of the new USA Trains cushioned coupler boxes. Some 1/16" dia brass tube (flattened to create the stirrup steps) and a couple rods of Detail Associates brass wire for grabirons and ladder rungs. A whole can of primer, and a can of color, and a can of gloss, and finally (haven't got to this point yet) a can of flat finish to seal it all. Then the drawing and printing of the decals (one sheet of Microscale 8 1/2 x 11 clear sheet) and the ALPS white printer ribbon (still on my first one). And finally how much would it cost to put in the hundreds of hours or so working on the whole project?
After summarizing it like that I guess I am glad I enjoy doing all that as I don't think I could make a living at producing those for a profit .
Brian Briggs
DT&I 1980ish
DT&I 1980ish
-
conrailmike
- Signal Maintainer
- Posts: 2832
- Joined: Tue Jan 30, 2007 9:59 pm
- Location: Less than 100' from CSX (LSRC) Saginaw Sub. MP 61.4 in Highland, MI
Re: 86' Hycube...it begins
Beautiful job and even better that it's in Conrail paint!!
-
GrandTrunkFan
- Railroadfan...fan
- Posts: 823
- Joined: Wed Jan 10, 2007 3:41 pm
- Location: Grass Lake, MI
Re: 86' Hycube...it begins
Kinda shocked to see Conrail, was expecting DTI!  Regardless, looks great!!
Nick
Re: 86' Hycube...it begins
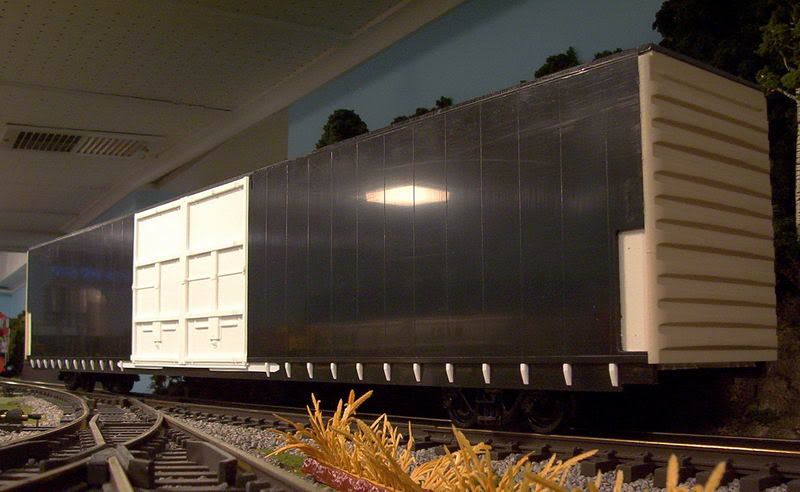
OK, I just finished applying the rest of the decals so here's my official builders photo of it.
Enjoy!
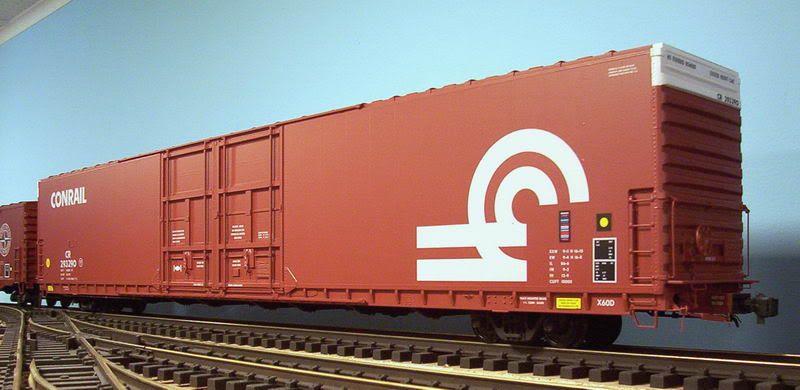
Enjoy!
Brian Briggs
DT&I 1980ish
DT&I 1980ish
-
atrainguy60
- Saginaw Sub Foamer
- Posts: 4100
- Joined: Sun Oct 30, 2011 1:54 pm
- Location: None of your business......
Re: 86' Hycube...it begins
I love it! You did a great job.
New Youtube page: https://www.youtube.com/channel/UCc5AC6 ... E7wQUw-reQ
-
bctrainfan
- Railroadfan...fan
- Posts: 1091
- Joined: Sat Jun 25, 2011 3:29 am
- Location: Battle Creek, MI
Re: 86' Hycube...it begins
Now if you could only add some details......
Really though, that is fantastic! Would make a great article in Railroad Model Craftsman!
BTW, AARR will probably need 20 or so of those 86 footers when he models Ford Dearborn Stamping so keep working!
Really though, that is fantastic! Would make a great article in Railroad Model Craftsman!
BTW, AARR will probably need 20 or so of those 86 footers when he models Ford Dearborn Stamping so keep working!
-
AARR
- Incognito and Irrelevant
- Posts: 39023
- Joined: Wed Dec 22, 2004 7:39 pm
- Location: Washington, MI
Re: 86' Hycube...it begins
Ditto! Maybe not 20 but at least one more DT&I unitbctrainfan wrote:Really though, that is fantastic! Would make a great article in Railroad Model Craftsman!
BTW, AARR will probably need 20 or so of those 86 footers when he models Ford Dearborn Stamping so keep working!
PatC created a monster, 'cause nobody wants to see Don Simon no more they want AARR I'm chopped liver, well if you want AARR this is what I'll give ya, bad humor mixed with irrelevant info that'll make you roll your eyes quicker than a ~Z~ banhammer...
Re: 86' Hycube...it begins
Don,
Just finished this one. It's USA Trains new 60' boxcar that I painted and decaled for GTW.
I have about 10 projects on the table right now....I work on what interests me or as I aquire that missing info.
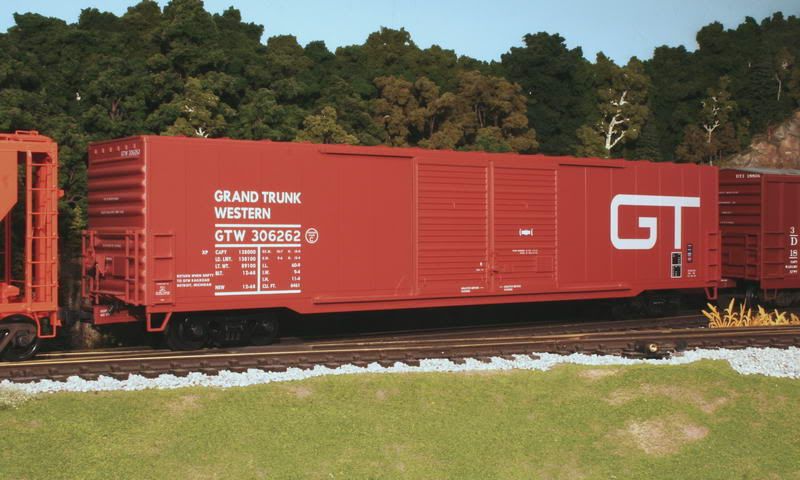
Just finished this one. It's USA Trains new 60' boxcar that I painted and decaled for GTW.
I have about 10 projects on the table right now....I work on what interests me or as I aquire that missing info.
Brian Briggs
DT&I 1980ish
DT&I 1980ish
-
AARR
- Incognito and Irrelevant
- Posts: 39023
- Joined: Wed Dec 22, 2004 7:39 pm
- Location: Washington, MI
Re: 86' Hycube...it begins
The GTW brown 60's with the lowered data and emblymn were among my favorite GTW cars! And you nailed the look. Have you considered submitting your work for publishing?
PatC created a monster, 'cause nobody wants to see Don Simon no more they want AARR I'm chopped liver, well if you want AARR this is what I'll give ya, bad humor mixed with irrelevant info that'll make you roll your eyes quicker than a ~Z~ banhammer...